By Norman Patry
Forty percent of all urban travel occurs within two miles of where people live, and 90% of those trips are taken by car. Cycling is a great alternative for short trips, reducing emissions and getting exercise. Knowing how to change a flat tire can increase your confidence as a cyclist and help you explore your neighborhood in a whole new way.
 To change a tire you need three things:
- tire levers
- a spare tube
- a pump or CO2 inflator

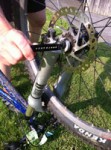
Begin by removing the wheel from the bicycle. Most bicycles with brake calipers have a mechanism that allows you to easily loosen the brakes to allow the wheel to pass between the calipers (disc brakes have no obstructing calipers).
 Next loosen the quick release found at the axle and remove the wheel.
To remove the tire , insert the curved end of the tire lever under the bead of the tire and attach the hooked end to one of the spokes. Insert another lever about two inches from the first, then insert the third and push it along the tire to remove the bead from the wheel.
  Once one side of the tire is released from the wheel you can remove the tube. Inspect the tire to ensure that the object that caused the flat is not embedded in the tire.

To install the new or repaired tube, put enough air in the tire to give it shape. Start by inserting the valve stem into the rim and then the tube into the tire. Once the tube is in place, replace the bead of the tire into the rim, being careful not to pinch the tube between the tire and the rim.  Once the tire is in place, inflate the tube to the recommended pressure, which can be found imprinted on the side of the tire.

Almost done. Reinsert the wheel onto the bike, tighten the quick release lever, lift the wheel and give it a shake to ensure that the wheel is firmly attached to bike, then reattach the brakes and off you go.

Norman Patry is the founder of Summer Feet Cycling, a Portland-based bicycle tour company that offers luxury cycling vacations in Maine, Canada and Europe. He also volunteers with the Bicycle Coalition of Maine.


So nice to have the photo tutorial. Thanks!